Thursday, April 22, 2010
Nominated for MN Bride Magazine Award!
Hot off the press:
Brett Dorrian Artistry has been officially nominated for the "Best of Hair and Makeup" category for the very prestigious MN Bride Magazine annual awards!
There will be a gala event for the awards ceremony in July where the winner is announced out of the top 3 nominees out of each category- kind of like the Oscars for MN wedding vendors. There were over 8,000 voters.
Thanks to all who voted!
Cheers,
Brett
Photo Credit and Copyright: 1 Fine Day Photography
Thursday, April 15, 2010
Allergies & Pigment - Where Is the Balance?
I recently had a friend who said she had issues with wheat by-products and was looking for perhaps a more natural makeup with high pigmentation. She uses bare minerals, due to allergies, but had an issue with how the pigment wears away after a few hours of wear. So, can you go green? And, how awesome are these fashionable mineral powders?
I did some research with a cosmetic chemist, and learned that there are no wheat by-products in any makeups. The only issue at all with some cosmetics and allergies is if it uses real lanolin, which is an animal by-product used as a vehicle (the lubrication part) of a makeup. Also, folks need to know that makeup is not 100% organic. All makeup, no mater what, has some sort of preservatives in it; so, unless your makeup requires living in the fridge, it is not organic by normal standards.
In terms of mineral makeups (bear with me- this is going to be unpopular), they are not good for lasting pigment, nor for allergies. Mineral powders, unless pressed into a cake (like how eye shadows exist in compacts), are simply loose flying straight pigment...that you breathe.
Strike 1: Anyone with allergies or respiratory issues will definitely have an issue with this makeup over time. The same goes for airbrushing. I'm not a huge fan of those personal airbrush systems that were launched this year due to that fact. As a professional artist, I have to wear a medical mask if airbrushing for more than an hour or so to protect my lungs, and I don't do it every day. I would not suggest anyone breathing anything loose in the air over time every single day.
Strike 2: The other problem with mineral powders are that they're straight pigment...yet they don't stay put. That's because they are just a loose powder with no vehicle (the lubricant in its chemistry) to make it stick to the skin. That's why you always see shiny, sad faces a few hours into the application.
Strike 3: If you have any fine lines or scarring, using mineral powders on top of that texture will just call attention to it even more; which is obviously not the point to making up ones face.
There. I said it. Loose mineral powders are not so swell. But, like I said, pressed powders are much safer to breath.
I suggest brands like Makeup Forever, Smashbox, NARS, Laura Mercier (for the more natural client) for a consumer-friendly, yet professional level pigmented foundation. If you want to get really into it, I do suggest Ben Nye and Joe Blasco for your deeper coverage (but you'll want to learn about applying with a sponge and doing some custom blending).
I do offer individual and group lessons to teach application, products, and more. Email or call with questions. I can always do a tutorial blog or product recommendation as well to touch lightly on a topic. :)
Cheers,
Brett
Under Eye Assistance - Product Recommendations
Under eye circles and puffiness. We've all been there. Some more than others. Late nights + genes = tiresome faces and unwanted age demarcation. That's just bad math that we don't need to compute nor deal with, ladies. I was recently asked to give suggestions for how to combat these eye issues that are far too common, yet a little tricky to deal with at home.
Puffiness:
One very natural way to get some light relief from morning eye puffiness is to sooth your delicate ocular area with chilled tea bags. Steep some green tea the night before, then drain and cool the tea bags, and store them in a baggie in the fridge until morning. That will retain their moisture as well and prep the necessary temp. In the morning, allow yourself a good 10 minutes (or until the chill has left the bags) to lay back and allow the cold moisture to dissipate some of your morning puffiness.
If you still have some darkness and lack of tightness, do yourself a favor and pick up Benefit's "Oo-La-La-Lift" eye cream (*first picture). And I quote, "A wonder eye cream that works like an instant eye lift." This stuff really does work. I might be becoming obsessed. It just pulls in the puff, lightens a bit, and creates that perky sparkle we all aspire towards in our windows to our souls.
Darkness:
A lot of everyday folks make the common (very common) mistake of trying to correct under eye circles with one of those odd yellow-lipstick-looking thingies they sell at the drugstore. We've all been there. The problem with loosely grabbing the first "concealer" you see, thinking they're all the same, they're not.
The thing to remember with under eye circles is that you're not trying to lighten as much as you need to color correct. The issue with using something as bright and chalky as thick yellow cream/stick product is that it's both way too hard to blend into the sheer foundations out there these days, and it also completely flattens out the planes of the face and looks awkwardly light in pictures.
So, first you color correct, then you conceal with a base-like cream. I have images showing two of the "Camouflage" Palettes Makeup Forever offers for color correcting. When choosing a color, really examine your undertones. What you want to do is minimize the color causing the darkness. The way to minimize it is by neutralizing the problem hue with its opposite color. For example, for blue circles, color correct with orange, and for brown, use pink. Somewhere between the blue and brown is what's happening under the eyes.
For at home color correcting, you can use a clean finger or sponge for working the cream color corrector in under the eyes. The nice thing about using a finger is that the natural oils and heat in the skin can help move the product into delicate areas. The last image shown is the full cover concealer from Makeup Forever, which is helpful for general blemishes, but also to lightly cover the color corrector you just placed under the eye. This should pull your coloring under your eye back to your natural base color, thus eliminating the darkness and discoloration you otherwise see.
I welcome any and all hair, makeup, product or general styling questions!
Cheers,
Brett
I try to suggest products that are easy to buy at your local Sephora or other consumer-based shoppe. The general product images were taken from an internet search.
Thursday, April 8, 2010
Rock the Dress (Rather than Trash the Dress) Sessions
Abbey Feldkamp is an up and coming, quietly quirky and genuine photographer totally rockin' the Rock the Dress sessions. She offers many types of photography for private clients, but I had the opportunity to collaborate on a client's styling for her wedding, and for her Rock the Dress session.
The client chose a Rock the Dress rather than Trash the Dress since:
A. who wants to trash the dress, really?
B. her dress was vintage and belonged to her grandmother.
C. Repeat letter "B."
I did a '40's inspired makeup and hair 'do encompassing details from a few favorite decades to pull together a very classic look for Brittany's wedding. Since the Rock the Dress is a session meant for a bit more daring look, location, and vibe than the wedding day, I went for a '60's cat eye and bouffant styling to create a flirty and fun look that still had flare and class.
The switch from the day-of images to a specialty photo shoot can be fall under any category- different hair style or makeup, different location, vibe, feeling, and/or just a specialty shoot for extra bride and groom sessions.
It is really fortunate to collaborate on these sessions with the same photographer and stylist if possible to build on the artistry consistently.
Check out Abbey's work at www.abbeyfeldkamphotography.blogspot.com
Cheers,
Brett
Photo credit and copyright: Abbey Feldkamp Photography
Apprenticeships & The Artist Referral Program- BDA Opportunities
I am happy to say that Brett Dorrian Artistry is growing- from magazine publications, to bridal awards, to traveling nationally for gigs and training.
From the get-go, I have been a mentor and teacher to many aspiring makeup artists. I take artists that I think are a good fit to my business and apprentice them into my bridal work and photo shoots as appropriate to further build the artist karma for us all. From there, demand has continued to grow- both for me to provide opportunities for artists, but also for me to provide artists to clients when I am unavailable.
Since I haven't figured out how to clone myself, and there's only one "Brett" that does what I do...I have come up with a new program to remedy the fact that I book out over 12 months in advance (especially for bridal work). I have officially launched an Artist Referral Program for experienced artists to filter bridal referrals through Brett Dorrian Artistry. If I am booked, I can refer my potential clients to an artist personally apprenticed by me to take on the booking.
To participate in this program, an artist must apprentice under Brett Dorrian Artistry for a minimum of 1 bridal season to be considered. Artists are welcome to shadow me upon a successful meet and greet (we need to like each other :) ), from there, possible apprenticeship, and from there, regular assisting and the referral program.
Call or email if you have any questions or are interested in more information.
Cheers,
Brett
Boudoir Photography and Styling
I have worked with Jennifer Wheeler of Serendipity Photography for a few years now. She is a brilliant photographer and wonderful artistic collaborator. She and I often will build a photo shoot concept with one another to make artistic and image dreams come true, not only for ourselves, but for our clients. I highly recommend Jen for your boudoir needs. You can check out more at www.mnboudoirphotography.com.
The styling that I do for boudoir is much like the attitude of the picture: classic and artistic. I often merge to vintage styling since period hair with a red lip always, ALWAYS, looks classic, smoldering, and powerful. I like the client's personality and style of wardrobe to inform the feeling and vibe of the styling. Sometimes the look is vintage, sometimes modern glam- whatever your style, I find the embodiment of how you want to play out your shoot.
Boudoir sessions are highly empowering and absolutely perfect gifts for anniversaries, upcoming weddings, valentine's day, birthdays, or hey, just because it's a Tuesday and you're being the woman you know you are on the inside: confident, beautiful, and vibrant.
At some point, you know handing your significant other a small album or bedside print of your most sexy self is a swell idea. So, get your sexy on.
Cheers,
Brett
*Click on the post title to link to the website for Jen's work. :)
Photo credit and copyright: Jennifer Wheeler with Serendipity Photography
9 Month Photo Session for Baby Evy
This is baby Eve's 9 month photo session I did back home in MN in March. I can hardly call her "baby Eve" since Evy is going to be a little lady of 1 Year Old in just a couple of months. I have had the distinct pleasure of photographing Evy's story since I did Anna & Grant's maternity session; and I have been with their family for newborn, 3 month, 6 month, and 9 month pictures. I will take her 1 year pictures and then compile their story through images to capture the most precious (and fastest flying) part of their first baby's life.
Stay tuned for what will be a most cute session of the happy family at the end of May. :)
Cheers,
Brett
Photo credit and copyright: Brett Dorrian Artistry
Wednesday, April 7, 2010
Beards, Beards...And More Beards
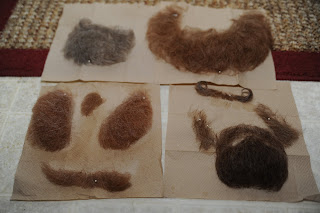
We've recently had the distinct pleasure of studying beard work under Mr. Fred Blau in my Masters II training. Do yourself a favor and IMDB and/or google this man. He worked on such little films as "Apocalypse Now" and tv shows as "Planet of the Apes." Uhm, yeah. Speechless. His finesse for what he does (and affectionately calls "whisker work") is simply stunning.
The array of pictures show the steps I have gone through working with crepe wool (the cheap stuff, on a film, you use real hair on the principles). Of course, the first one is just for some fun! I had to sit for a classmate to do an application, so I figured I'd let my theatre background stick out a little. The last pictures are of trying out laying pieces on guys, with the overlay that blends the edges.
Here's the technical process (I have SO MUCH respect for beard work now):
First, you start with the braids of hair. You have to steam them or boil them to straighten slightly. Then you hackle them through, basically, a giant spiked comb. Yes, if you touch it, you bleed. From there, you blend 3-4 colors together, then build your beard work onto a tuffy head, which is the mannequin head for this. It's very tricky to lay a beard since you have to get the hair in the right direction and thickness, layer by layer to look like it is follicle by follicle. From there, you style with an old fashioned marcel iron and stove. Then you trim and shape. Glue with a spray adhesive, lift off of the tuffy head with alcohol.
Then ta-da! You have a piece ready for your actor. Whew!
Enjoy!
Cheers,
Brett
Photo credit and copyright: Brett Dorrian Artistry
Subscribe to:
Posts (Atom)